After writing my last blog post I decided I really should update the code so I can control the temperature thresholds without having to rebuild and upload the code to the Arduino. That isn’t a big issue when I have easy access to the board and a suitable computer nearby, but doing this over the network is dangerous because I could brick the board and wouldn’t be able to disconnect the power or press the reset button. Also, the default position of the transistor is off, which means that bad code loaded onto the Arduino shuts off the fan.
But I will have a serial port connection through the USB port on the server (which is how I will monitor the status of the setup), and I can send commands at the same time I’m receiving data. Updating the code to handle simple one-character messages is pretty easy.
First, I needed to add a pair of variables to store the thresholds, and initialize them to their defaults. I also replaced the hard-coded values in the temperature difference comparison section of the program with these variables.
int temp_diff_full = 6;
int temp_diff_half = 2;
Then, inside the main loop, I added this:
// Check for inputs
while (Serial.available()) {
    int ser = Serial.read();
    switch (ser) {
        case 70: // F
            temp_diff_full = temp_diff_full + 1;
            Serial.print("full speed = ");
            Serial.println(temp_diff_full);
            break;
        case 102: // f
            temp_diff_full = temp_diff_full - 1;
            Serial.print("full speed = ");
            Serial.println(temp_diff_full);
            break;
        case 72: // H
            temp_diff_half = temp_diff_half + 1;
            Serial.print("half speed = ");
            Serial.println(temp_diff_half);
            break;
        case 104: // h
            temp_diff_half = temp_diff_half - 1;
            Serial.print("half speed = ");
            Serial.println(temp_diff_half);
            break;
        case 100: // d
            temp_diff_full = 6;
            temp_diff_half = 2;
            Serial.print("full speed = ");
            Serial.println(temp_diff_full);
            Serial.print("half speed = ");
            Serial.println(temp_diff_half);
            break;
    }
}
This checks to see if there’s any data in the serial buffer, and if there is, it reads it one character at a time. Raising and lowering the full speed threshold by one degree can be done by sending F to raise and f to lower; the half speed thresholds are changed with H and h, and sending d will return the values back to 6 and 2.
One of our servers at work has a power supply that is cooled with two small, loud fans—loud enough that the noise is annoying for the occupants of the office suite shared by the server. What I’d like to do is muffle the sound by enclosing the rear of the server (or potentially just the power supply exhaust) with an actively vented box. Since the fan on the box will be larger, it should be able to move the same amount of air with less noise.
But messing around with the way servers cool themselves is tricky, and since the server isn’t easily accessible, I’d like to be able to monitor what’s going on until I confirm my setup is able to keep the server cool.
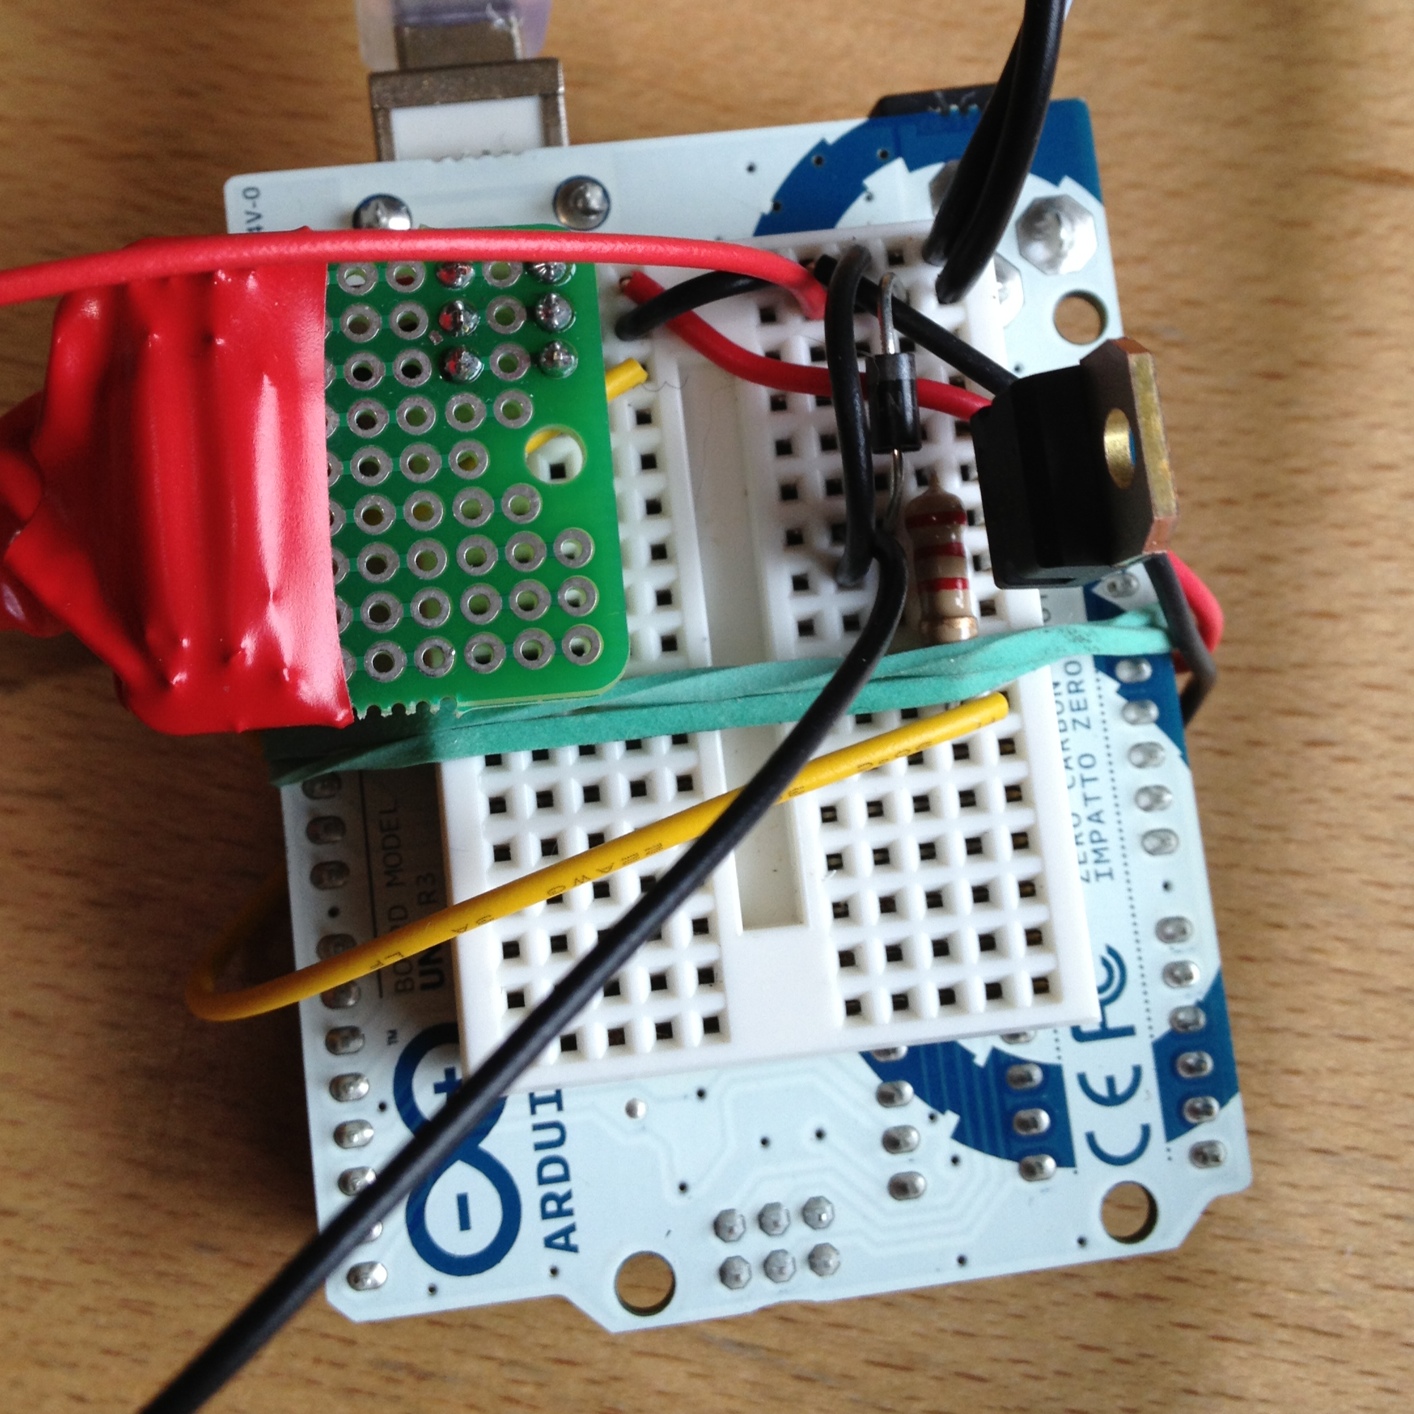
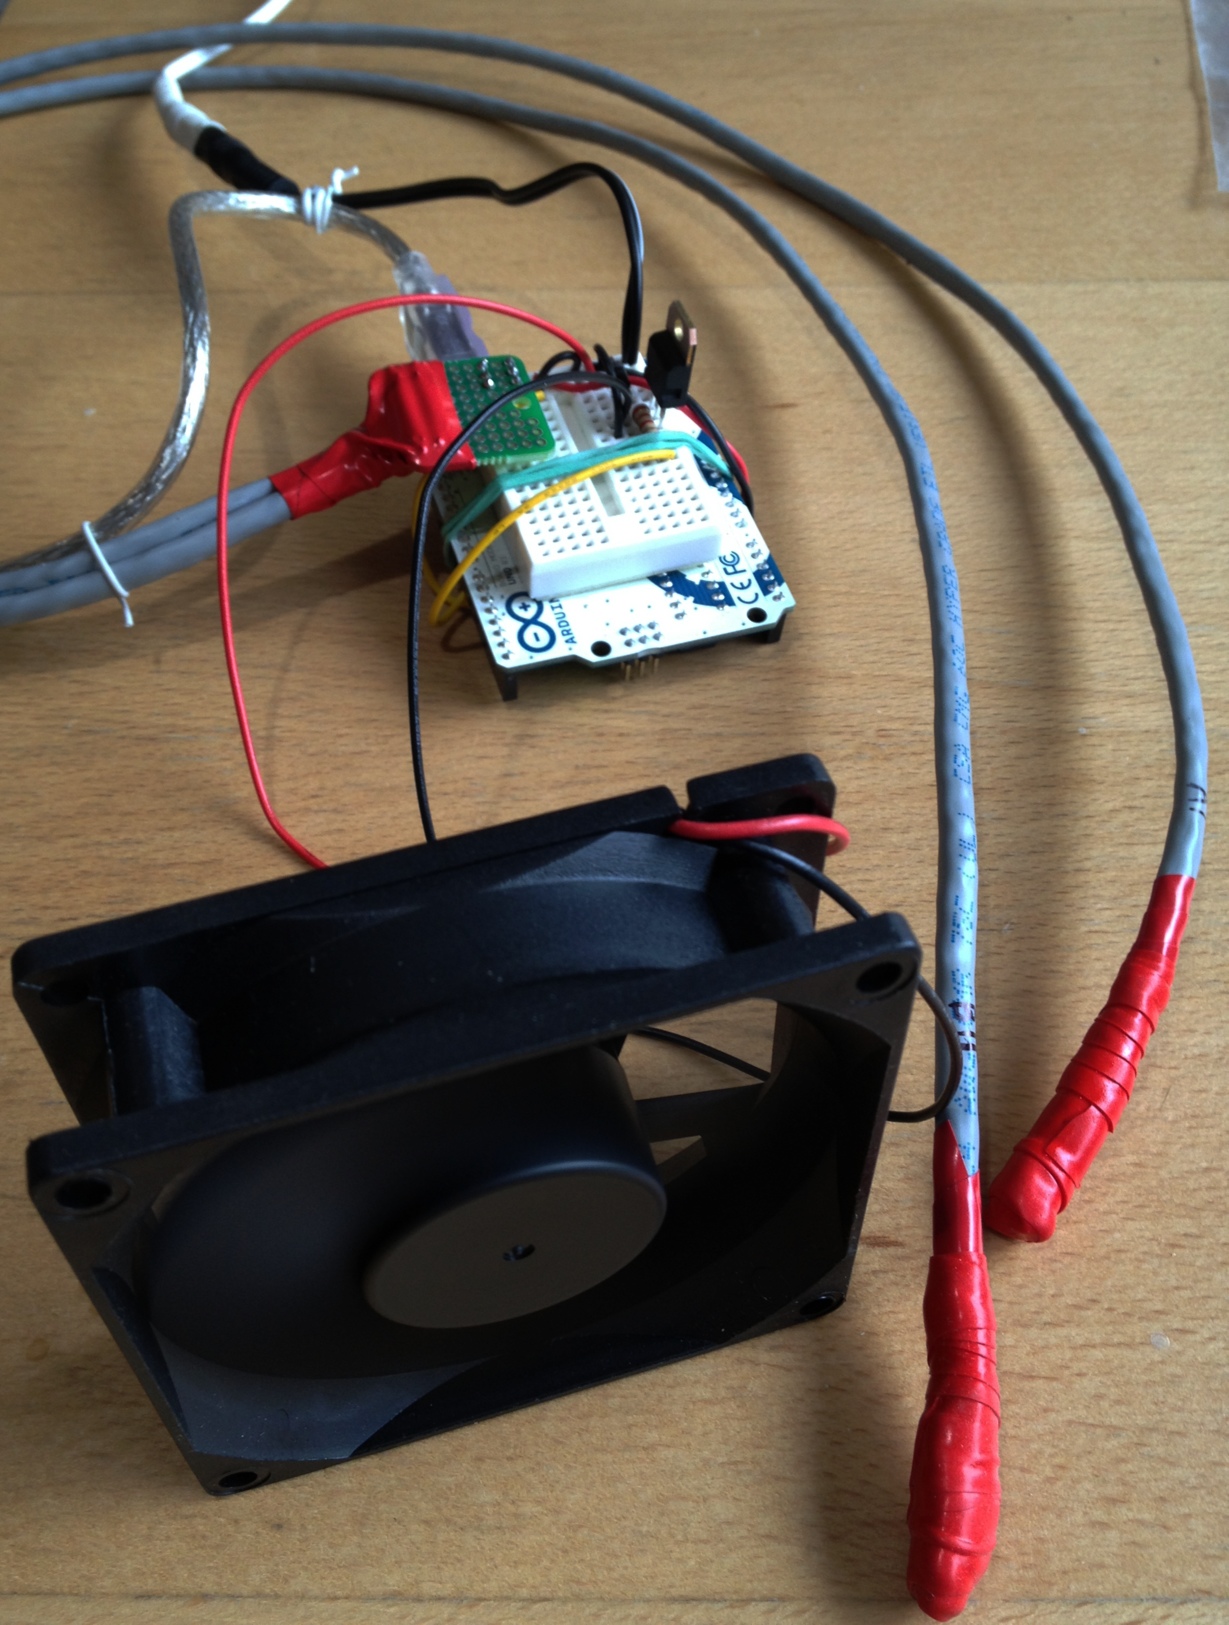
I’ve built quite a few temperature monitoring circuits, but in this project I’ll need to be able to control the speed of the vent fan based on the temperature differential inside and outside the box. This is complicated because the Arduino runs on 5 volts and the fan I’m starting with requires 12 volts. I’ll use a Darlington transistor, which can be triggered using the low power available from an Arduino pin, but which can carry the voltage and current of the fan. For higher voltages and currents, or for controlling devices that run on alternating current, I’d need to use some form of relay.
To measure the temperature differential between the inside and outside of the enclosure, I’m using two DS18B20 temperature sensors, each wired to the end of a length of Cat5e cable (and wrapped in silicone “Rescue Tape” as an experiment). The transistor is a TIP120, and a 1N4001 diode across the positive and negative leads of the fan protect it from reverse voltages when the fan is turned off but is still spinning. A 2.2KΩ resistor protects the trigger pin on the Arduino.
Here’s the diagram:
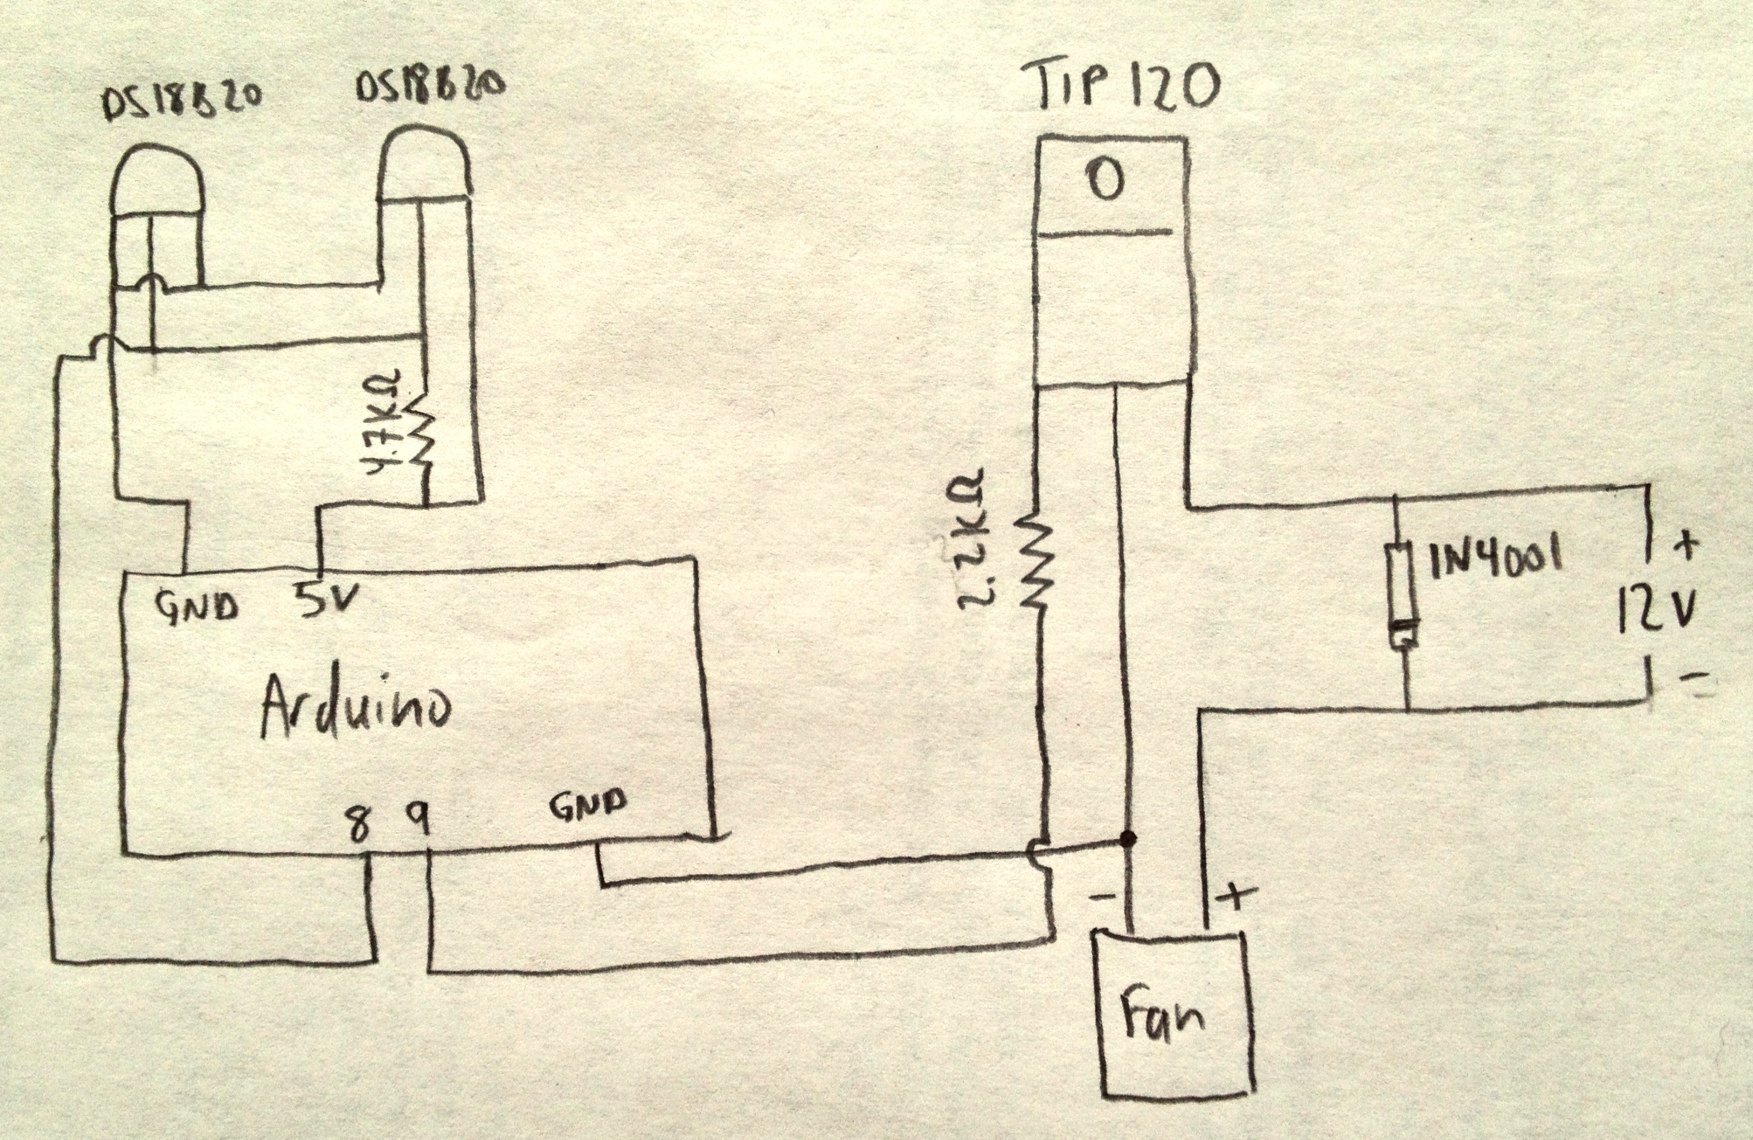
The Arduino is currently programmed to turn the fan on full speed when the temperature from the sensor inside the box is more than six degrees higher than the temperature outside the box. The fan runs at half speed until there’s less than a two degree differential, at which point the fan shuts off. These targets are hard-coded in the software, but it wouldn’t be too difficult to change the code to read from the serial buffer so that the thresholds could be changed while it’s running.
Here’s the setup code:
#include <OneWire.h>
#include <DallasTemperature.h>

#define ONE_WIRE_BUS 8
#define TEMPERATURE_PRECISION 12

#define fanPin 9

OneWire oneWire(ONE_WIRE_BUS);
DallasTemperature sensors(&oneWire);

DeviceAddress thermOne = { 0x28,0x7A,0xBA,0x0A,0x02,0x00,0x00,0xD1 };
DeviceAddress thermTwo = { 0x28,0x8B,0xFD,0x0A,0x02,0x00,0x00,0x96 };

void setup() {
    Serial.begin(9600);
    pinMode(fanPin, OUTPUT);
    digitalWrite(fanPin, LOW);

    sensors.begin();

    sensors.setResolution(thermOne, TEMPERATURE_PRECISION);
    sensors.setResolution(thermTwo, TEMPERATURE_PRECISION);
}

void printTemperature(DeviceAddress deviceAddress) {
    float tempC = sensors.getTempC(deviceAddress);
    Serial.print(DallasTemperature::toFahrenheit(tempC));
}
And the loop that does the real work:
void loop() {
    sensors.requestTemperatures();
    printTemperature(thermOne);
    Serial.print(",");
    printTemperature(thermTwo);
    Serial.print(",");
    float thermOneF = DallasTemperature::toFahrenheit(sensors.getTempC(thermOne));
    float thermTwoF = DallasTemperature::toFahrenheit(sensors.getTempC(thermTwo));
    float diff = thermOneF - thermTwoF;
    Serial.print(diff);
    Serial.print(",");
    if ((diff) > 6.0) {
        Serial.println("high");
        digitalWrite(fanPin, HIGH);
    } else if (diff > 2.0) {
        Serial.println("med");
        analogWrite(fanPin, 127);
    } else {
        Serial.println("off");
        digitalWrite(fanPin, LOW);
    }
    delay(10000);
}
When I’m turning the fan off or on, I’m using digitalWrite, but when running the fan at half-speed, because I’m using a pulse-width-modulation (PWM) digital pin, I can set the pin to a value between 0 (off all the time) and 255 (on all the time) and cause the fan to run at whatever speed I want. I’m also dumping the temperatures and fan speed setting to the serial port so I can read those values later and evaluate how well the setup is working.